Tuesday, March 29, 2011

Depth of Field?! I'm Not a Farmer!


Recently, and one of the reasons I haven't posted anything for so long, my eye glasses broke.  Some may think that is a good thing because then new frames would be in the near future.  But not for me--I didn't have any vision assistance as backup.  After freaking out at the obscene amount of money I had to fork out in order to see, I realized just how grateful I am for the ability to see clearly, and for those geniuses who can cut, grind and polish plastic in such a distinct way that I am able to have clear vision both near and far.  As I was looking at vision simulations showing the difference in bifocal lenses and progressive lenses, I thought how it could be used in understanding depth of field in photography.

Image A
Image A shows a typical viewing distance in a corrective lens using the progressive lens. For those of you who have not reached the "vision over 40" dilemma yet, just wait. Your turn is coming. I would also highly recommend  the progressive over typical bifocal.  Why?  The first reason is pure vanity--no one can see by looking at your glasses that you need corrective reading glasses.  The second is vain also--no need to have those cute little glasses with the chain on the ear pieces hanging on the end of your nose.

Image B

Now, on to Image B.  You can see the three different focus areas in the three types of lenses.  With just a reading lens, (top photo) you are only able to see a very narrow depth.  Thus, your DEPTH OF FIELD is short or shallow.  This is where you can see the comparison between eyeglasses and camera depth of field.  The middle photo has even a more narrow viewing area as you can see by the clear circle area and the bottom photo has the greatest viewing area, or the widest depth of field.
So, how do I do that in my camera, you ask?  The depth of field in an image is referring to the area that appears acceptably sharp and is mainly controlled by the aperture. So, your focusing area may be the entire scene before you, or just one tiny little flower.  Below are some images that show differing depths of field.
This image has a shallow depth of field--the focus is on the girl in the center, with everyone else being out of focus.  Notice that the transition from sharp to blurry is not a defined area but a gradual one. Some cameras have the ability to let you see the depth of field based on your camera settings--way cool advantage here, cause you don't have to think as hard--just kidding.  Remember the blog post that described the aperture settings and showed a picture of the way the different aperture settings looked?  You can go back to the archive and read it later.  The aperture controls how much light is allowed in the camera, thus controlling how much of the image is in focus.
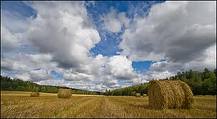
  
This image of the hay field shows a large depth of field which is a great way to show off scenic photos like this one.  The aperture was probably set at f/16 or even f/22 in order to make sure everything was sharp from the front of the scene to the back of the scene--just like the progressive lens, you can see clearly from the close up area to the far distant area.

Controlling your depth of field is fun!  Don't get scared here, but you WILL need to take your camera off of auto mode.  You need to be able to tell the camera what to do.  Side note, here:  if you are a scrapbooker and tend to cut off large portions of your photos because you don't like the areas in the photo around your subject, try changing your aperture to create a shallow depth of field next time you take pictures at that party or of your child at the park, etc.  You will be pleased with the results. 

So, time to go practice.  You may think that understanding depth of field is way out of your league, but fear not.  It can be conquered.  It takes practice, practice, practice.  There are formulas and lots of other technical stuff that can help you understand, but I think the easiest way to start is to simplify the  concept.  So, I hope this helps you.  If you have questions, or don't quite understand what I am saying, please feel free to contact me, or even leave a message.  No question is a stupid question.

Friday, February 18, 2011

Photos in the raw

For those of you who have a camera that can shoot "raw" and you are not using it are totally missing out!   Capturing an image in raw mode is like getting dressed for the day.  When you take a shower, I am guessing that none of you shower with clothes on, so that is where we will make the analogy.  This is not kinky in any way, just a way to explain.

What is raw?
A raw image file can be compared to the not yet visible image in an exposed but undeveloped negative--you've taken the picture, advanced the film, but not developed the roll.  The file contains exactly what the imaging chip in the camera recorded. (The imaging chip is the film for a digital camera.) This means that you are now able to get the most quality from your image.  Raw files take up LOTS of space on your card, but require processing in a dedicated photo editing software (the software that came with the camera).  Another cool thing about raw files is that you can process them over and over and over.

What is jpeg?
A jpeg image file is like a processed and developed negative.  All the sharpening, contrast, white balance, color saturation, etc. has been completed in the camera and then compressed.   Jpeg images take up less space on your card so many photographers choose to shoot in this mode.  They may not have time to do the post-processing required by raw files, and for most jpeg images, the quality may be sufficient to get a decent printed image.


So below I have compared 5 images.  Image #1 shows the picture as it was captured in raw.  (In order to post it with this blog I saved it as a jpeg).  So this is the "naked" image.   It is an ok picture, but the exposure is not perfect.  I snapped this of my daughter while I was waiting for a client to arrive and didn't fine tune the exposure reading from my light meter before I took the picture.  I know, I know.  But since the camera was in raw mode, I can make it better. I uploaded the image to a photo editing software and processed or "dressed" the image. Now don't get the idea that the purpose of raw is to "fix" everything.  It's purpose is to "enhance", "develop", "process", "retain quality". 

Next, let's put some "clothes" on it.  The first thing I did to the image was to lighten it.  It was too dark for my taste, and looked a little muddy.  Image #2 shows the lightened image.  Then, I "accessorised" the image--#3 has increased contrast,  #4 is sharpened, and #5 is warmed up a bit.

Processing your images in the raw mode will preserve the quality before you play with it in your photo editing software. 

Friday, February 4, 2011

F-stop is not a swear word

Think about what happens to your eyes when you have been sitting in a dark movie theatre in the middle of the day and exit the theatre through the side door that goes directly outside.  You immediately squint your eyes because it is so bright, right?  The aperture of the camera works in the same way your eyes work.  (Well, I am hoping your eyes work because you might have a bit of a problem with photography if your eyes are not up to par). 

The number one job of a camera is to gather light.  This is accomplished by the aperture.  It opens and closes to increase or decrease the amount of light that is allowed in the camera to create an image.  The size of the aperture opening is represented by f/stops, i.e., f/2.8, f/8, f/16, etc.  Okay, now pay attention here because this is where lots of people get confused:  the larger the f/number, the smaller the aperture opening.  It works in the same way as an iris of an eye (that's the colored part of the eye), except we don't manually adjust the iris of our eyes to let in less or more light.  I will put in a plug here for READ YOUR MANUAL because a photographer should be in control of the camera, not the camera in control of the photographer.  Your manual might refer to f/stop as 'aperture value'.  Don't lose heart, it means the same.


If you look at the yellow image to the right, you will see 8 standard f/numbers next to an aperture size.  This is a good representation of the way light is allowed in the camera.  FYI, the aperture is located in the lens, not the camera.

With this information, now would be a good time to go practice using the different aperture sizes.  Take a notebook with you and write down the frame number, and the corresponding information about each image taken.  It would be very beneficial to see the differences in aperture size if you were to take all your test shots of the same setting.  For instance, you decide to practice on your flowers in your yard.  Your notes might look like this:
Frame #
1--f/16 at 60 (shutter speed).
2--f/16 at 125
3--f/11 at 60
4--f/11 at 125
etc.

When you upload the images to your computer, you will see the difference of the f/stops in the outcome of the image. 

Sunday, January 30, 2011

I have a nice camera. Let's make some money!

Well, here goes!  My first ever post on a blog. 

How can I help YOU, is probably the first thing on your mind right now.  You could be saying to yourself, 'I have a nice camera.  I am going to make money taking pictures for people.'  Well, that is all fine and dandy, and I am so glad you have a nice camera.  Now, the question arises, 'Do you know how to use that camera?'  The first thing I tell anyone who receives an item of any kind, is 'read the instructions'.  This is SO over the top important for learning a camera.  If you have this really nice camera, say like a Canon Rebel, (which I know has all these really cool manual options for shooting that anyone would just drool over if you showed it to them) and you only used the camera set on AUTO mode (that's the little green rectangle on the mode dial) you would be wasting your money.  You could take the same pictures on a little point and shoot--and don't get me wrong, here.  Point and shoot cameras have a purpose and some of them are really good cameras.  But if you want to make money by taking pictures for someone else, you need to learn the camera and what it can do for you.
After you learn how to use your camera, then you can have some fun with it.  You will be the one in control of what the camera does--not the other way around.

So, now what do you do to get some work?  It costs an awful lot of money to advertise, but word of mouth is the cheapest form out there.  The first thing I would suggest is talk to your neighbors.  No matter where you live, you've got to have some neighbors, even if they live 13 miles away.  Ask them if they would be willing to let you photograph their family.  Now here is the real clincher--you should let them know it is free.  Yes, FREE.  You won't be using film, here, so you can shoot images to your hearts content, or until the card is full--so always have extra cards on hand. 

OK, back to the FREE family sitting.  You can even offer them a free print.  When they are a satisfied customer, they will tell two people, and they will tell two people, and so on and so on.  It works both ways here so I am subtly letting you know that you need to tell others about this blog.  OK, that wasn't really that subtle, but let them know that this is the place to follow if you want ideas and help. 

On this blog, I will be showing how some photos could be made better, i.e. positioning, hand placement, even body placement, lighting (the biggest element of photography).  I will also be talking about scrap booking (or as some husbands might refer to it-crap booking).  Your photos can take a 'crapbook' to a memory worth hanging on your wall.